Thursday 4 February 2016

3D Model and Animation Timeline - Mechanical Marvel


This is My 3D model and animation timeline showing how the industry developed in its early years.

Contextual Studies


This is my Artist Statement which sums me up as an artist and how I like to work, this is helpful as companies can understand if I'm the right employer for the job.

This is where I compared and contrasted two famous artists who worked on creature design. this helped me develop my own art and understand how they work themselves. 

 This is my creature artist research, this is so I understand other artists processes and work schedule.
We researched different to look at what poses I could put my own art pieces in.


To better our skills as artists we researched other artists and cultures so we can pull influence from the things I have researched.
We looked at symbolism of animals, so that we understand what our art could symbolise.

This is where we looked at different artists and there pieces of art and discussed whether we thought their work constituted as art. We got further understanding of how our own art would progress.

Texture Research - Mechanical Marvel

I researched different textures so that I understood how to use textures and how they're supposed to look. It will hopefully help a lot more in later projects, when I have to fully texture models.


Lighting and Camera Angles - Mechanical Marvel


My lighting and camera angles gave me a good idea of how my rendered model would look like. this helped so that before we spend the long time rendering we can make sure we get the best look for the rendered image.


Robotic Arm Finished - Mechanical Marvel

We had to create a robotic arm using a photo of a real arm, we did this to give us an idea to how robots would look. It also gave us an idea of how human anatomy works and how joints would look and function.

Work Critique - Mechanical Marvel


Early on the project the class did a group critique, this is the feedback I got, I tried to correct the problems, it lead me to changing my research and focusing on the messenger bot, unfortunately that idea didn't go as I had hoped so I changed it into my finished design.

Artist Interpretation - Mechanical Marvel


For my artists interpretation I looked at an artists who's work I admired and tried to recreate there work process. Following the artists process helped as I tried something new, I don't think I will follow his process again as I'm not particularly proud of the end product. I tried my best to incorporate colour as i believed that was the most prominent feature of the original piece but i added my own spin on it by keeping the colour in a cell shading style.

Joint Research - Mechanical Model


I researched different joints and they're uses, this helped me when it came to creating and designing my robot because I already knew how joints moved and what places to put them. This didn't affect my model very much as it didn't have many joints.

Observational Drawings - Mechanical Marvel

I sketched mechanical objects to give me a feel of how parts of my robot would look. I took things that I might incorporate into my robot such as a screw and oil pot. We concentrated on the formal of art so that we could study the skill and be able to employ it into later projects.

Industry Software - Mechanical Marvel

In games design we use many different software, first they use 2D software such as Photoshop and Illustrator. Then they move onto 3D as Maya, ZBrush, Mudbox and 3DS Max. They edit with Sony Vegas Pro and Adobe Premiere. They make texture maps with XNormal.

Adobe Phtoshop

Adobe Illustrator
Autodesk Maya

Autodesk Mudbox


ZBrush


Autodesk 3ds Max


Sony Vegas Pro


Adobe Premiere


XNormal


Wednesday 3 February 2016

Texture Map Research - Mechanical Marvel

This is my texture research, I looked at diffuse, specular and normal maps. This helped me me understand how to use and where textures should be used with my model.

Tuesday 2 February 2016

Animation Artist Research - Mechanical Marvel


https://youtu.be/oGH-BAZXJV8

Joel Garvin uses Photoshop and Maya to create his art pieces. He has the same process as me and many other artists, he begins with sketching initial ideas. He then decides which of his initial ideas he like s the most and carries onto to develop those ideas. he then chooses which developed he likes the most and which one he wants to take to a finished p[product, after deciding which one he will finish he moves it into Photoshop and paintsd his final concept. He then Models it in Maya and textures it. After modeling his model he animates and renders it. He's a freelance artist, he mainly models vehicles or Sci-fi mechanics.


3D Artist Research - Mechanical Marvel


Jacques Achilles is a freelance 3D modeller, he concentrates on mechanical creations and robots. he uses Photoshop and ZBrush. His job skills include digital painting and digital sculpting, illustration and concept art. His process is similar to ours, he begins with sketching his initial ideas and then he develops his ideas. After this he moves his sketches to Photoshop where he paints his final finished concept piece, he may create an orthographic. He then creates his 3D model using his orthographic as reference. I don't know his full process because he uses ZBrush which is a piece of software I've never used before.


Monday 1 February 2016

2D Artist Research - Ryan Winch


Ryan Winch starts with researching ideas and art that influences his art. after this he sketches out different ideas for his drawing and then chooses which one he wants to develop. After choosing which one he wants to develop he continues modifying it until he is happy. After this he inks it and scans it into Photoshop. He then adds colour and features to his work which gives the artwork more character and makes it look distinguished. To finish off he adds high and low lights to make his work feel finished and polished. 

Ryan works for Disney Interactive. He uses Photoshop, Illustrator and Maya. He creates using traditional media as well, such as Ink, Water Colours, Oil Painting and Gouache. He Kickstarted his own illustration book called Splinters.

Thursday 28 January 2016

Finished 3D Model - Mechanical Marvel

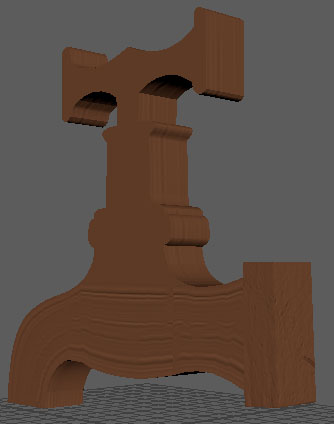
This is my final finished 3D model of my robot design, luckily the creation of my robot was relatively easy. I was hopeful of how well my original 2D design was going to translate into a 3D model. 
I began with a simple sphere in Maya and then I continued to intrude the sphere to create the eye of my robot. I then proceeded to trim the top and bottom of my robot to give it a squarer more mechanical look to my robot while keeping its more circular feel.
My next step was to add square holders for the visor that I decided to incorporate into my model. My robot wasn't originally meant to include a visor but I felt that it looked too simple and bland so i added one to give it a bit of variety and add a bit more character. The problem with this was that it didn't keep the sleeker look to the robot with the blockier looking visor.  
I took away the visor and concentrated on the base model to make it look smoother and sleeker, so that it looked more futuristic and cleaner looking robot. I also added a top part that was supposed to represent a solar panel to give my robot power and a bottom part which was intended to house the thrusters for the robot.
I then put the visors back into the model and curved them so they look more natural and uniform in comparison to the rest of the robot. After making it look smoother I much preferred the look of my robot after the addition. 
After placing my visor there I modelled the shutters that eject from my visor to cover the eye of my robot. I then had to fully animate the shutters closing so that, the problem this caused was the fact i had to hollow out the visor to make it look correct when the shutter ejects.
I added the back panels to make the robot look more futuristic, I feel it really worked well for the look of my robot.

I am very happy with my final look of my 3D model, it is looking fairly simple but I feel like the small editions have gave it characteristic that can hopefully be expanded upon when I texture the model. One thing I don't like is how clean the look of my robot is, whereas my original idea is that I was going to create a very rustic and old looking robot.  
This is my final rendered animation, I animated a protective shutter closing over my robots eye. I put my model in a ambient occlusion light box to give it the correct lighting to show off my animation and model. I tired to make my animation as smooth as possible, I ended up using over 70 frames to give it the best look

Tap Experiment - Mechanical Marvel

To introduce us to Maya we had to look at a picture of a tap, we created a free image plain to create a silhouette of the tap to get a clear look at the tap to make a correct looking model. I used the layer interface to lock the free image plane layer so that I couldn't accidentally move the image plain. Then we create one square polygon and extrude the faces and then we had to use the vertex tool to add definition to the tap to make it look like an actual tap. I also used the insert edge loop tool to make the handles and the base of the tap squarer to the smoothed look of the rest of the tap. I also learned how to texture models, as you see underneath. I also learnt how to change the colour and look of my model, this will help in the future. This helped us get used to the interface and the basic uses of the most important tools that we would be using in future projects. I found this to be very helpful as I had forgot how to use a lot of the important Maya tools.