Monday, 1 February 2016

2D Artist Research - Ryan Winch


Ryan Winch starts with researching ideas and art that influences his art. after this he sketches out different ideas for his drawing and then chooses which one he wants to develop. After choosing which one he wants to develop he continues modifying it until he is happy. After this he inks it and scans it into Photoshop. He then adds colour and features to his work which gives the artwork more character and makes it look distinguished. To finish off he adds high and low lights to make his work feel finished and polished. 

Ryan works for Disney Interactive. He uses Photoshop, Illustrator and Maya. He creates using traditional media as well, such as Ink, Water Colours, Oil Painting and Gouache. He Kickstarted his own illustration book called Splinters.

Thursday, 28 January 2016

Finished 3D Model - Mechanical Marvel

This is my final finished 3D model of my robot design, luckily the creation of my robot was relatively easy. I was hopeful of how well my original 2D design was going to translate into a 3D model. 
I began with a simple sphere in Maya and then I continued to intrude the sphere to create the eye of my robot. I then proceeded to trim the top and bottom of my robot to give it a squarer more mechanical look to my robot while keeping its more circular feel.
My next step was to add square holders for the visor that I decided to incorporate into my model. My robot wasn't originally meant to include a visor but I felt that it looked too simple and bland so i added one to give it a bit of variety and add a bit more character. The problem with this was that it didn't keep the sleeker look to the robot with the blockier looking visor.  
I took away the visor and concentrated on the base model to make it look smoother and sleeker, so that it looked more futuristic and cleaner looking robot. I also added a top part that was supposed to represent a solar panel to give my robot power and a bottom part which was intended to house the thrusters for the robot.
I then put the visors back into the model and curved them so they look more natural and uniform in comparison to the rest of the robot. After making it look smoother I much preferred the look of my robot after the addition. 
After placing my visor there I modelled the shutters that eject from my visor to cover the eye of my robot. I then had to fully animate the shutters closing so that, the problem this caused was the fact i had to hollow out the visor to make it look correct when the shutter ejects.
I added the back panels to make the robot look more futuristic, I feel it really worked well for the look of my robot.

I am very happy with my final look of my 3D model, it is looking fairly simple but I feel like the small editions have gave it characteristic that can hopefully be expanded upon when I texture the model. One thing I don't like is how clean the look of my robot is, whereas my original idea is that I was going to create a very rustic and old looking robot.  
This is my final rendered animation, I animated a protective shutter closing over my robots eye. I put my model in a ambient occlusion light box to give it the correct lighting to show off my animation and model. I tired to make my animation as smooth as possible, I ended up using over 70 frames to give it the best look

Tap Experiment - Mechanical Marvel

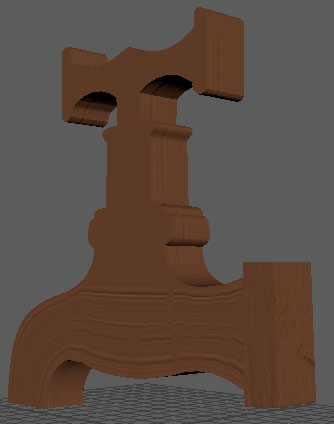
To introduce us to Maya we had to look at a picture of a tap, we created a free image plain to create a silhouette of the tap to get a clear look at the tap to make a correct looking model. I used the layer interface to lock the free image plane layer so that I couldn't accidentally move the image plain. Then we create one square polygon and extrude the faces and then we had to use the vertex tool to add definition to the tap to make it look like an actual tap. I also used the insert edge loop tool to make the handles and the base of the tap squarer to the smoothed look of the rest of the tap. I also learned how to texture models, as you see underneath. I also learnt how to change the colour and look of my model, this will help in the future. This helped us get used to the interface and the basic uses of the most important tools that we would be using in future projects. I found this to be very helpful as I had forgot how to use a lot of the important Maya tools. 


Wednesday, 27 January 2016

Photoshop Final Piece Screenshots - Mechanical Marvel


I had a base idea for what I wanted my robot to look like, as you saw in my initial and developed sketches. I started by getting the shape down and then worked on what I thought the best colour scheme would be for the robot, I settled on silver and pink because it’s a very bright and friendly colour scheme so that the robot wouldn't scare people.

I then added the eye and toyed around with different colour for the light bar to see what it would look like if it took a darker effect. I feel like this didn't work as well I thought it might be. So I went back to pink.

I feel like the light blue eye works much better when coupled with the pink background because it stood out and makes it look bright and eye catching. I also darkened the metallic colour of the robot to make the eye and light bar look brighter and stand out more. 


I then made the power bar light up, so that it looks better and contrasts against the darker metal.  

After making the power bar light up, I added highlights and lowlights to add depth to the robot so that it looks more realistic. I also added some features such as the robots designation its and the light effects on the the robot. 

I'm unhappy with my finished design because I know I could do better and the design is very simple with very little distinguishable features. Though I do feel that it will look very good as a 3D model but doesn't work so well as a 2D painting.  

Thursday, 17 December 2015

Sketchbook Work - Mechanical Marvel

Initial And Observational Drawings (WIP)

These are my initial idea sketches, I need to fill this page up with more ideas because at this point I don't feel like I have enough ideas to be completely happy with this piece of work.

These are some observational drawings, this is where we took pictures of steampunk looking robots and add our own details to giver them an original spin. I wasn't happy with the results because I wasn't happy with the ideas I got down or how creative I was

This piece of work was how I came up with the look of my final piece, I had the idea of a flying exploration robot but I couldn't think of the shape or look of the robot. So I filled a page of my sketchbook with random shapes that looked like they could work as a flying exploration robot and that is when I came up with the final look of my robot.

Silhouette's 


I created silhouette's to give myself ideas on how my robot could look and I also used it to develop my ideas.

Artist Interpretation and Mechanical Joints (WIP)

This is my artist interpretation of Matias Hannecke's robot digital painting I found, It interested me because it was an well done mecha that had a unique spin on it because of the colour and cartoony art style. So I first started to sketch it and after that I need to take it into photoshop and colour it. 

These are my mechanical joints drawings that I need to add more detail and show function more clearly, I also need to add more of these mechanical joints. I struggled with this particular piece of work because of my lack of knowledge of how the human body works and mechanical objects.

Developed Sketch

This is my developed sketch of an idea I had for the look and shape of my robot, I think that I will carry on this design into my final piece. I like the simplistic look of the robot and though I am not pleased with how it looks in a 2D format I am hopeful of how it will look after I model it in 3D.  


Tuesday, 8 December 2015

Gantter Chart and Robotic Arm Experiment - Mechanical Marvel


Robotic Arm - WIP

This is an experiment in how to take organic joints and make them mechanical, as you can see in the wrist of the arm. I have other experimental sketches of mechanical joints that I will upload shortly.


Gantter Chart


This is my Gantter chart which is used as a checklist while I work through the project so that I can keep on top of work I need to do.

Wednesday, 2 December 2015

Critique sheets - Mechanical Marvel


These are responses to my peers about what I think of their work so far and what they think of their mine so far.